Setting Up an Inbound Integration
Available: Starter and Premium
Video: Inbound Tutorial
Introduction
Building an inbound integration in Plinqx is a structured process that ensures seamless data flow into your Salesforce environment. This guide outlines the steps to configure an inbound API using the Plinqx Management Console, ensuring your design decisions are effectively implemented.
Starting the Integration Setup
-
Accessing the Plinqx Management Console:
- Navigate to the Plinqx Management Console in your Salesforce environment.
-
Initiating a New Integration:
- Click the 'New' button to start setting up a new inbound integration.

Defining the Integration Details
-
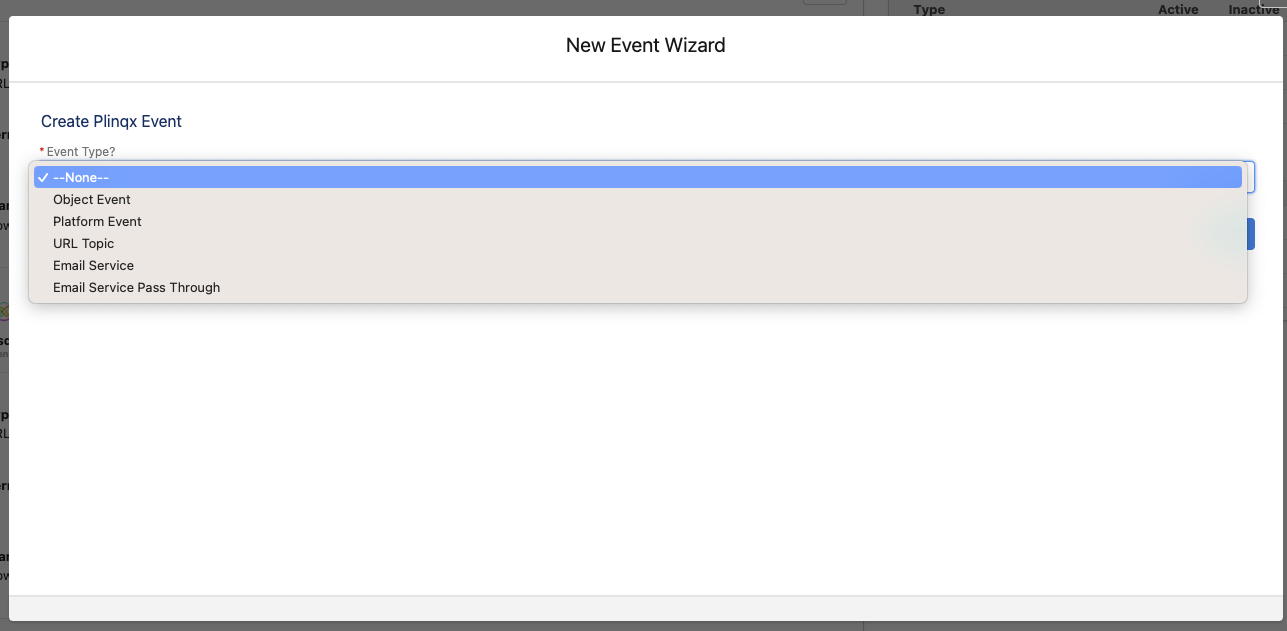
Selecting Event Type:
- Choose 'URL Topic' as the event type for inbound integrations.
-
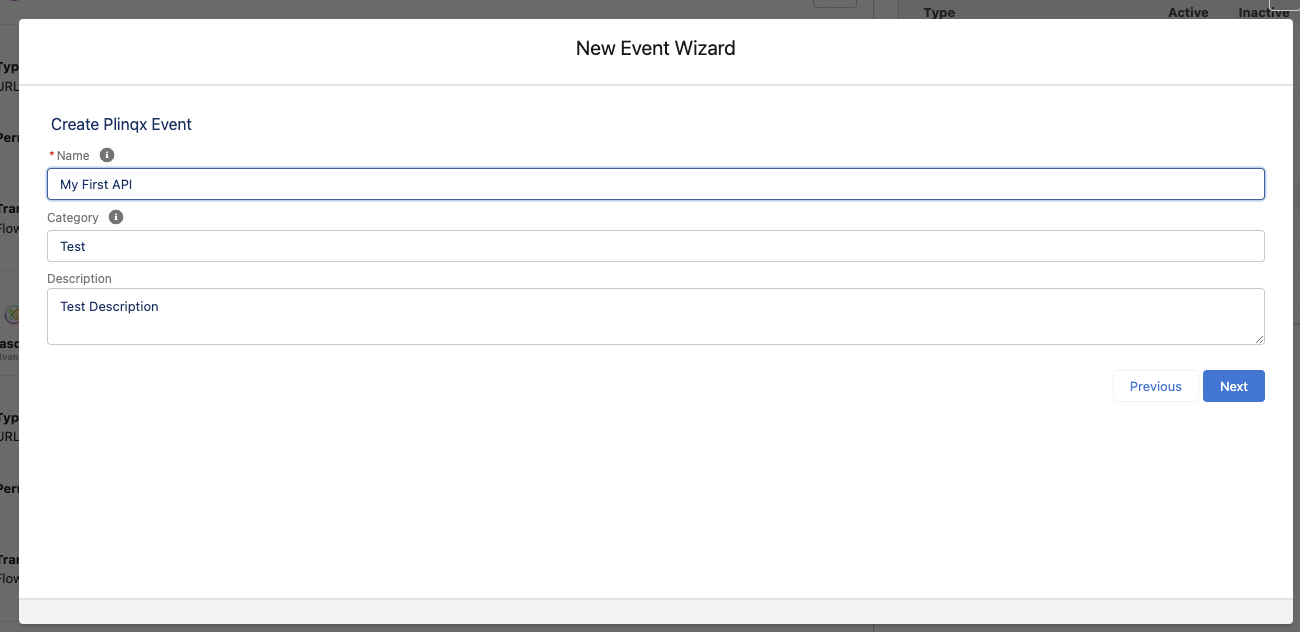
Naming Your API:
- Provide a meaningful name for your API. This name will be used for identification and reference.
-
Categorizing the API:
- Assign categories to your API for easier filtering in the management console. Categories can be multiple and separated by commas.
-
Adding a Description:
- Include a description for your API. This description will be helpful in the auto-generation of API documentation.


Setting the Endpoint and Permissions
-
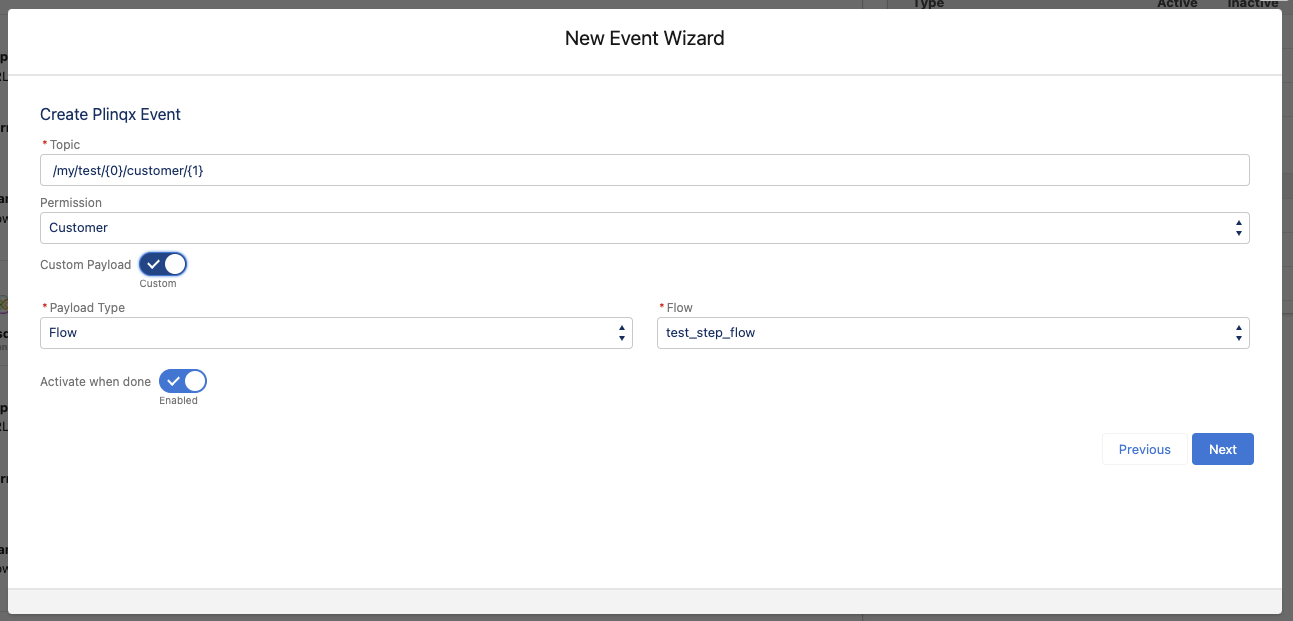
Defining the URL Endpoint:
- Specify the URL endpoint for the inbound call. The URL should start with a forward slash ('/') and can include wildcards (e.g.,
-
Selecting Permissions:
- Choose a permission set if a custom permission is required for the calling user or account.

Configuring the Payload
- Specify the Payload Type:
-
Standard:
Use a pre-defined payload structure.
-
Custom:
Define a custom payload structure.
-
APEX:
Call a custom APEX class implementing the Plinqx Interface class.
-
Plinqx Mapping:
Utilise a Plinqx mapping for the payload.
-
Flow:
Select a Salesforce flow to handle the payload.
-
Step Engine:
Select a Step Orchestration to handle the inbound request processing (useful for large orchestration logic)
-
Final Steps
-
Setting Up Steps (if needed):
- Steps can be used for large or long-running orchestrated payload/data construction and delivery.
-
Activating the Integration:
- Select 'Activate' to activate the integration upon deployment. Alternatively, you can leave this inactive and activate it later.
-
Deploying the Integration:
- Click 'Next' to proceed with the deployment of your inbound integration.
Conclusion
Setting up an inbound integration in Plinqx is a critical step in ensuring that your external data sources are seamlessly integrated into Salesforce. By following these steps, you can establish a robust and effective inbound API, tailored to your specific data handling requirements.
Testing Your Plinqx API
Introduction to Testing Your Plinqx API
Testing your Plinqx API is an essential step in the development and deployment process, serving as a critical measure to ensure that the API functions as intended. The purpose of testing is to verify that your API not only receives and processes requests correctly but also responds as expected under various conditions. This involves sending predefined payloads to the API and carefully observing the outcomes, comparing them against expected results. By doing so, you can confirm that the API handles data accurately, adheres to defined business logic, and integrates seamlessly within your Salesforce environment. Effective testing helps identify and rectify issues early, ensuring reliability and efficiency of your API before it goes live. Whether you're adding new features, fixing bugs, or making configuration changes, thorough testing provides the assurance that your API will perform correctly under real-world operating conditions.
Introduction to API Testing Tools
To ensure the proper functionality of your Plinqx API, it's important to test it using reliable tools. Two recommended tools for this purpose are Postman and Salesforce Workbench.
-
Postman:
- Postman is a popular API client that makes it easy to create, share, test, and document APIs. It provides a user-friendly interface to send requests to APIs and view responses. Postman supports various types of HTTP requests and is widely used for API testing and development.
-
Salesforce Workbench:
- Salesforce Workbench is a web-based tool that allows Salesforce users to interact with their Salesforce org. It provides functionalities like data insert, update, upsert, delete, and allows users to execute SOQL queries, test REST APIs, and more. It's directly integrated with Salesforce, so there's no need for separate authentication when testing APIs.
Testing with Postman
-
Using Salesforce Postman Collection:
- Salesforce provides a Postman collection, which is a set of preconfigured requests for Salesforce APIs. This collection can be used to test your Plinqx API endpoints efficiently.
-
Authenticating with OAuth:
- To authenticate your API requests in Postman, use OAuth 2.0, which is a secure method for tokens exchange. You'll need to set up OAuth credentials in Postman using your Salesforce org's details.
-
Sending a Request:
-
Construct your API request in Postman. The full API endpoint format for your Plinqx API will be:
{{_endpoint}}/services/apexrest/Plinqx/v1/services/{{_topic}} -
Here,
_endpointis your Salesforce org's external URL, and_topicis your chosen topic URL endpoint.
-
Testing with Salesforce Workbench
-
Accessing REST Explorer:
- In Workbench, navigate to the 'utilities' section and select 'REST Explorer'.
-
Sending a Request:
-
Input the API endpoint
/services/apexrest/Plinqx/v1/services/{{_topic}}in the REST Explorer. Replace{{_topic}}with your topic URL endpoint. -
Since Workbench is already authenticated with your Salesforce org, you can directly send the request to test the API.
-
Important Notes for API Testing
-
Use a Sandbox for Testing:
- It is advised to conduct all tests in a Salesforce Sandbox environment. This allows you to simulate real-world scenarios without affecting your live data and configurations.
-
Utilise an Integration Profile and Connected App:
-
For testing, use a dedicated integration profile linked to a Salesforce integration license. Ensure this profile has only the minimum required permissions to execute the API. For example, if your API only creates Leads, then only grant 'Create' permission on the Lead object and restrict access to necessary fields.
-
Enhance security further by configuring IP restrictions for this profile, which limits access to users within specific network locations.
-
-
Authentication Methods:
- While OAuth is the recommended method for authentication due to its security and flexibility, other authentication methods are also available and can be used based on your specific requirements and configurations.
Optional Apex Testing for your Plinqx API
While writing an Apex Test Class for your Plinqx API isn't mandatory, it's a strategic practice to ensure the API's consistent performance, especially when making changes elsewhere in your Salesforce system. Apex tests facilitate regression and unit testing, helping to safeguard against unintended side effects that updates or new features might introduce. By simulating API calls and employing assertions to check responses, you can preemptively identify and resolve issues, maintaining the API's integrity over time. These tests are particularly valuable when you're aiming for comprehensive quality assurance in your application's lifecycle. Below is a basic template for an Apex test class to test your Plinqx API:
@IsTest
private class PlinqxTopicsTest {

    @IsTest
    static void testPlinqxTopicsPostMethod() {
        // Test setup if necessary

        Test.startTest();
        // Simulate a POST request
        Plinqx.restResult postResponse = Plinqx.Topics.doPOST();
        Test.stopTest();

        // Assertions to validate the response of POST method
        // Replace with assertions relevant to your implementation
        System.assertNotEquals(
            null, postResponse, 'Response should not be null'
        );
        // Additional assertions as per the expected behavior of doPOST()
    }

    @IsTest
    static void testPlinqxTopicsGetMethod() {
        // Test setup if necessary

        Test.startTest();
        // Simulate a GET request
        Plinqx.restResult getResponse = Topics.doGET();
        Test.stopTest();

        // Assertions to validate the response of GET method
        // Replace with assertions relevant to your implementation
        System.assertNotEquals(
            null, getResponse, 'Response should not be null'
        );
        // Additional assertions as per the expected behavior of doGET()
    }

    // Similar test methods for doPATCH() and doPUT()
}
Conclusion
Testing your Plinqx API is a crucial step in ensuring that it functions correctly within your Salesforce environment. Utilizing tools like Postman and Salesforce Workbench can significantly streamline the testing process, providing insights into the API's behaviour and response. By following these best practices, such as using a Sandbox, setting up a dedicated integration profile, and choosing the appropriate authentication method, you can confidently validate your API's functionality while adhering to security standards and minimising risks. Regular testing is recommended to maintain the API's efficiency and reliability.